How to Add Scenes and Sources in OBS Studio
Share
If you're new to OBS Studio, understanding how to set up scenes and sources is crucial for creating professional-quality live streams and recordings. In this guide, we'll break down the difference between scenes and sources, how to add them, and best practices for managing your OBS setup. Watch our full YouTube video on this topic for a step-by-step walkthrough!
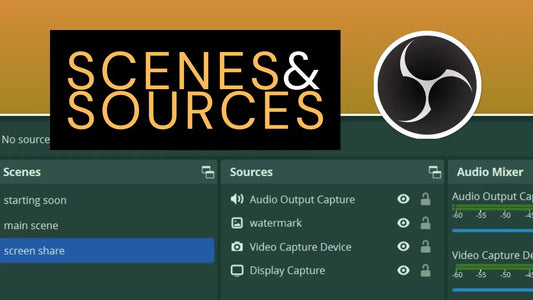
What Are Scenes and Sources in OBS Studio?
- Sources are the individual elements that make up your broadcast, such as audio, video, images, text, and screen captures.
- Scenes act as containers for sources, allowing you to organize different layouts and transitions for smooth switching during your stream.
Setting Up Scenes in OBS Studio
-
Create a New Scene Collection:
- Go to Scene Collection > New and name your collection (e.g., "Live Stream Scenes").
- This helps you save different setups for various projects.
- Add and Manage Scenes:
-
- By default, you start with one scene. Click the + button in the Scenes panel to create additional ones.
- Rename scenes by right-clicking and selecting Rename (e.g., "Starting Soon," "Main Scene").
Adding Sources to Your Scenes
-
Adding an Image Source:
- Click the + button in the Sources panel and select Image.
- Browse for your image file and adjust its size using Transform > Fit to Screen.
-
Adding Text:
- Select Text (GDI+), type your message, and customize the font, size, color, and background.
-
Adding Media and Audio:
- For background music, choose Media Source, browse for an audio file, and enable Loop.
- Use Audio Input Capture for microphones and Audio Output Capture for desktop audio.
-
Adding a Webcam (Video Capture Device):
- Select Video Capture Device, pick your webcam, and adjust the resolution and FPS.
-
Adding a Display or Window Capture:
- Choose Display Capture to share your entire screen.
- Use Window Capture to display a specific application window.
Managing Sources Effectively
Lock sources to prevent accidental movement.
- Use layers to adjust visibility (higher in the list = in front).
- Enable filters for color correction, transparency, and more.
Switching Between Scenes and Using Transitions
Click a scene in the Scenes panel to switch between layouts.
Customize scene transitions under Scene Transitions (e.g., Fade, Cut, Slide).
Watch the Full Tutorial
For a full step-by-step guide, check out our YouTube video on How to Add Scenes and Sources in OBS Studio. Subscribe for more OBS tutorials and live-streaming tips!